
Halloween is one of those magical times of year when food becomes more than just food — it turns into fun, creativity, and laughter. Whether you’re hosting a costume party, preparing snacks for your kids’ school event, or simply craving something festive, Mini Mummy Pizzas are the perfect go-to treat.
These little bite-sized delights bring a spooky charm to your table with their cheesy “mummy wrappings” and olive “eyes” staring back at you. But beyond their cute and creepy look, they’re quick to make, delicious to eat, and guaranteed to be the hit of any Halloween party.
In this guide, we’ll cover everything you need to know about crafting the perfect Mini Mummy Pizzas — from ingredients and step-by-step directions to creative variations, serving tips, and clever make-ahead options.
🧡 Why Mini Mummy Pizzas Are the Ultimate Halloween Treat
Halloween is all about whimsical fun and flavorful surprises, and these Mini Mummy Pizzas check both boxes. Here’s why they deserve a spot on your spooky menu:
- Quick & Simple: Ready in just 20–25 minutes, including baking time.
- Kid-Friendly: Children love decorating their own mummy faces with cheese and olives.
- Customizable: You can play around with toppings, sauces, and cheeses.
- Budget-Friendly: Uses basic ingredients you probably already have.
- Perfect for Parties: Easy to serve and eat — no mess, no utensils required!
If you’re short on time but want maximum Halloween flair, this recipe will be your new favorite. 👻
🧀 Ingredients You’ll Need
Gathering the right ingredients makes the process even more fun. You won’t need anything fancy — just a few pantry staples and a little creativity.
Essential Ingredients
- 4 English Muffins, split into halves
(These make the perfect base — soft inside, crisp on the edges.) - 1 cup Pizza Sauce
(Homemade or store-bought works fine. Go for a tangy tomato flavor.) - 1 cup Shredded Mozzarella Cheese
(The key to your mummy “bandages.” Stretchy, melty perfection!) - ½ cup Black Olives, sliced
(For those spooky little eyes!) - 1 teaspoon Italian Seasoning
(Adds aroma and flavor with herbs like oregano, basil, and thyme.)
Optional Add-Ons
- Mini Pepperoni Slices – for a smoky bite
- Chopped Bell Peppers – to sneak in veggies
- Crushed Red Pepper Flakes – for spice lovers
- Garlic Powder or Parmesan – to enhance flavor
- Whole Wheat English Muffins – for a healthier twist
📝 Pro Tip: Set up a small “topping bar” so kids or guests can build their own mummies. It makes the cooking experience interactive and memorable!
🔥 Step-by-Step Guide to Making Mini Mummy Pizzas
Step 1: Preheat the Oven
Set your oven to 375°F (190°C). A well-preheated oven ensures your muffins turn golden and your cheese melts evenly.
Step 2: Prepare the Muffins
Split the English muffins and place them cut-side up on a baking sheet lined with parchment paper. This will prevent sticking and make cleanup easier.
Step 3: Spread the Sauce
Spoon about a tablespoon of pizza sauce onto each muffin half. Spread it evenly to the edges for full flavor in every bite.
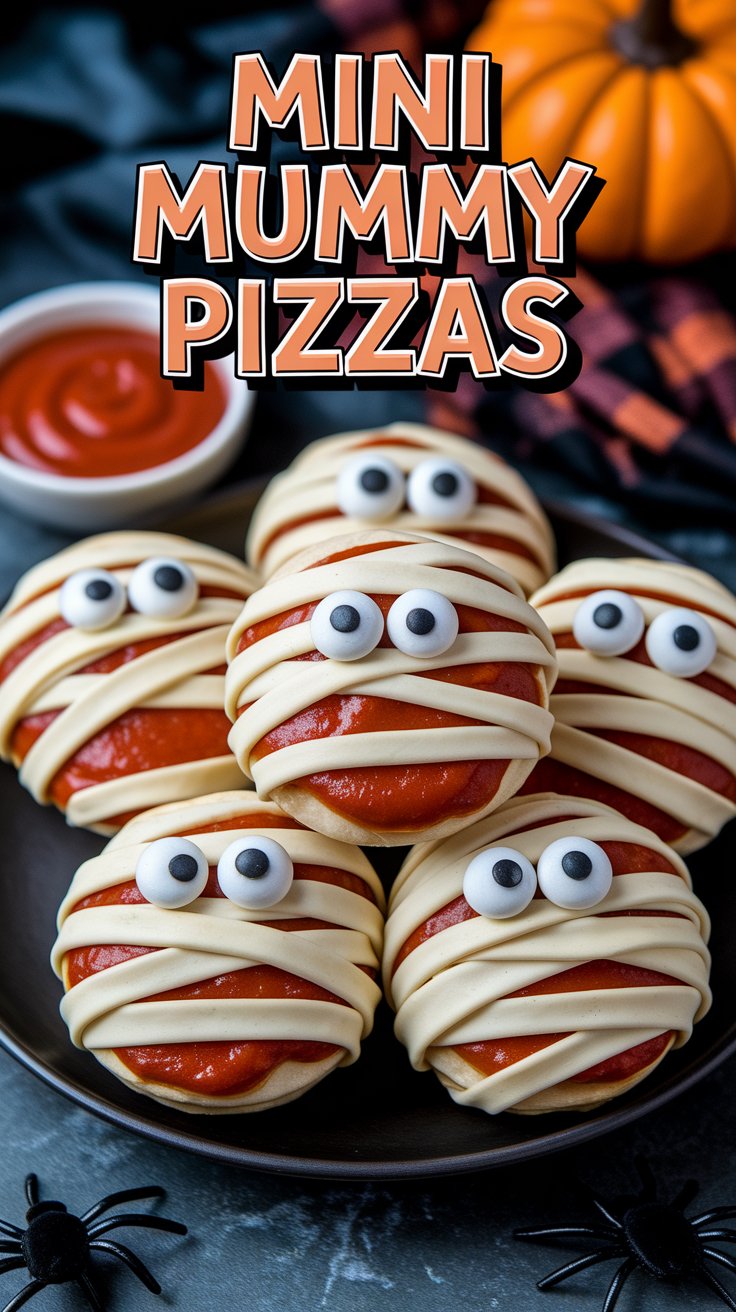
Step 4: Add the Cheese Strips
Instead of sprinkling cheese randomly, cut the mozzarella into thin strips. Lay them across the muffin to look like mummy bandages, leaving small spaces for the eyes.
Step 5: Place the Eyes
Use two black olive slices for each pizza’s eyes. Press them gently into the cheese so they stay in place during baking.
Step 6: Sprinkle Seasoning
Dust a little Italian seasoning or dried oregano over the top for extra flavor and that irresistible pizza aroma.
Step 7: Bake to Perfection
Bake in the preheated oven for 10–12 minutes, or until the cheese is melted and slightly golden.
Step 8: Cool and Serve
Let them cool for 2–3 minutes before serving. The cheese will set a bit, making them easier to handle.
And just like that — your spooky, cheesy mummies are ready to haunt your taste buds! 🧟♀️
🍕 Expert Tips for Perfect Mini Mummy Pizzas
To elevate your mummy pizzas from good to great, keep these expert tips in mind:
- Crispier Base: Toast the English muffins for 2–3 minutes before adding toppings.
- Even Melting: Use freshly shredded mozzarella instead of pre-packaged — it melts smoother.
- Balanced Flavor: Don’t overload the sauce; a thin layer prevents sogginess.
- Batch Cooking: Make a double batch — they disappear fast at parties!
- Get Creative: Add red pepper eyes, jalapeño smiles, or even little candy corn “fangs” for fun.
🕸️ Variations to Try
The fun part about Mini Mummy Pizzas is how flexible they are. Here are some creative spins you can try:
1. Gluten-Free Mummies
Use gluten-free muffins or small rice cakes as the base — perfect for guests with dietary restrictions.
2. Vegan Mummies
Swap mozzarella for vegan cheese and use plant-based olives or veggie toppings.
3. Spicy Mummies
Add a drizzle of hot sauce or sprinkle of crushed red pepper for fiery flavor.
4. Monster Family
Create different characters — “Frankenstein pizzas” with green peppers, or “Ghost pizzas” using white cheese only!
5. Breakfast Mummies
Replace pizza sauce with scrambled eggs and bacon bits, then top with cheese strips for a Halloween-themed morning meal.
🥗 Serving Suggestions
These Mini Mummy Pizzas are versatile — you can serve them as snacks, appetizers, or even a full meal with sides.
Here are a few serving ideas:
- 🥗 Pair with a fresh salad for a balanced meal.
- 🍹 Serve with apple cider, pumpkin punch, or a spooky green smoothie for kids.
- 🍟 Add a side of sweet potato fries or veggie sticks for extra crunch.
- 🧊 For parties, serve them on a black or orange platter for a Halloween-ready presentation.
Want to get even more creative? Arrange the pizzas in the shape of a skeleton or ghost face on your table — instant party centerpiece!
❄️ How to Store and Reheat
Got leftovers? Don’t worry — these Mini Mummy Pizzas store beautifully.
Refrigerate:
- Store in an airtight container for up to 3 days.
- Reheat in the oven for 5–7 minutes at 350°F (175°C).
Freeze:
- Freeze uncooked pizzas on a baking sheet for 1–2 hours.
- Once solid, transfer to a freezer bag.
- Bake directly from frozen (add 3–5 extra minutes).
This makes them perfect for meal prepping before Halloween night or for busy school lunches.
👩🍳 Make-Ahead Ideas
If you’re planning a big party, make things easier by prepping parts of the recipe in advance:
- Slice olives and shred cheese the day before.
- Pre-split muffins and store them in airtight containers.
- Assemble pizzas a few hours before guests arrive, refrigerate them, and bake just before serving.
This way, you can spend more time enjoying the spooky fun and less time worrying in the kitchen.
🎭 Fun for Kids: Let Them Decorate!
This recipe isn’t just about cooking — it’s about creativity. Kids absolutely love assembling their own little mummies!
Set up a “Mummy Pizza Station” with small bowls of toppings like:
- Olives (for eyes)
- Cheese strips (for wrappings)
- Mini pepperoni
- Colorful peppers
Let them design, decorate, and name their mummies. It turns dinner into an interactive Halloween craft that keeps everyone entertained.
💡 Nutritional Information (Per Serving)
Approximate values (1 mini pizza):
- Calories: 150
- Protein: 6g
- Carbohydrates: 18g
- Fat: 6g
- Fiber: 1g
- Sugar: 2g
- Sodium: 300mg
It’s a fun treat that balances taste and health — perfect for both kids and adults.
🧤 Equipment You’ll Need
You don’t need a fancy setup to make these Halloween snacks. Just a few basic tools:
- Baking sheet or pizza stone
- Spatula or tongs
- Knife and cutting board
- Mixing spoon
- Oven mitts
If you have a pizza cutter, it makes slicing easier once they cool slightly.
🕷️ Common Mistakes to Avoid
Even simple recipes can go wrong without attention to detail. Here are a few pitfalls to steer clear of:
- Overloading with Sauce: Too much sauce makes muffins soggy.
- Skipping the Preheat: Cold ovens lead to uneven baking.
- Using Pre-Shredded Cheese: It contains anti-caking agents that prevent smooth melting.
- Forgetting to Cool: Let them rest for 2 minutes before serving — melted cheese can burn!
- Crowding the Pan: Give each pizza space so heat circulates evenly.
Follow these and your mummy pizzas will always come out picture-perfect.
🎃 Mini Mummy Pizza Party Ideas
If you’re hosting a Halloween event, these pizzas can easily become the star of your food table. Here’s how to make your spread extra special:
Theme Ideas
- “Monster Munchies” Buffet: Include mummy pizzas, ghost-shaped sandwiches, and pumpkin deviled eggs.
- DIY Pizza Corner: Let guests build and bake their own spooky creations.
- Candlelit Setting: Dim the lights and use flickering LED candles for that eerie effect.
Decorations
- Use black and orange napkins, cobweb tablecloths, and fun labels like “Mummy’s Snacks” or “Cheesy Horrors.”
- Arrange pizzas in a coffin-shaped tray or spooky platter for dramatic presentation.
It’s these little touches that turn an ordinary meal into an unforgettable Halloween memory.
🧡 A Healthier Take on Mini Mummy Pizzas
Want to indulge guilt-free? You can make this recipe healthier without losing flavor.
- Use whole-grain muffins for extra fiber.
- Opt for low-fat mozzarella or plant-based cheese.
- Add more veggies like spinach, mushrooms, or bell peppers.
- Use less sauce and drizzle olive oil for richness.
- Bake instead of fry (as in this recipe) — keeping it light and crispy.
With these tweaks, you’ll have a nutritious yet festive snack everyone will love.
🕸️ Frequently Asked Questions (FAQs)
❓ Can I make Mini Mummy Pizzas ahead of time?
Yes! Assemble them earlier in the day, cover, refrigerate, and bake right before serving.
❓ Are these pizzas vegetarian?
Yes — as long as you use vegetarian cheese and skip meat toppings.
❓ How can I make them gluten-free?
Use gluten-free English muffins or small gluten-free pizza crusts.
❓ Can kids help with this recipe?
Absolutely! It’s safe and fun for kids — just handle the baking yourself.
❓ Can I use another base instead of muffins?
Yes, try pita bread, bagels, or tortilla rounds for variation.
🎉 Bringing It All Together: The Joy of Mini Mummy Pizzas
At its core, making Mini Mummy Pizzas is about more than just cooking. It’s about connection, creativity, and celebration. From the laughter that fills the kitchen to the smell of bubbling cheese and toasted muffins, these little snacks embody the spirit of Halloween — playful, delicious, and just the right amount of spooky.
Whether you’re making them for a party, family night, or simply to treat yourself, they’ll bring joy with every bite. And the best part? You don’t need to be a professional chef — just a little imagination and a love for festive food!
So this Halloween, skip the store-bought snacks and let your kitchen be the haunted heart of the celebration. Fire up that oven, grab your cheese and olives, and wrap up some Mini Mummy magic today. 🧟♂️