
When Halloween season rolls in, magic fills the air — the leaves crunch underfoot, pumpkin spice takes over every café, and the excitement of spooky celebrations begins to rise. Amidst the costumes, decorations, and candy hunts, one thing stands out — fun and creative Halloween snacks that bring everyone together.
If you’re looking for a festive and easy idea to delight your family and guests, these Halloween Sausage Mummy Wraps are your ultimate go-to! 🧡
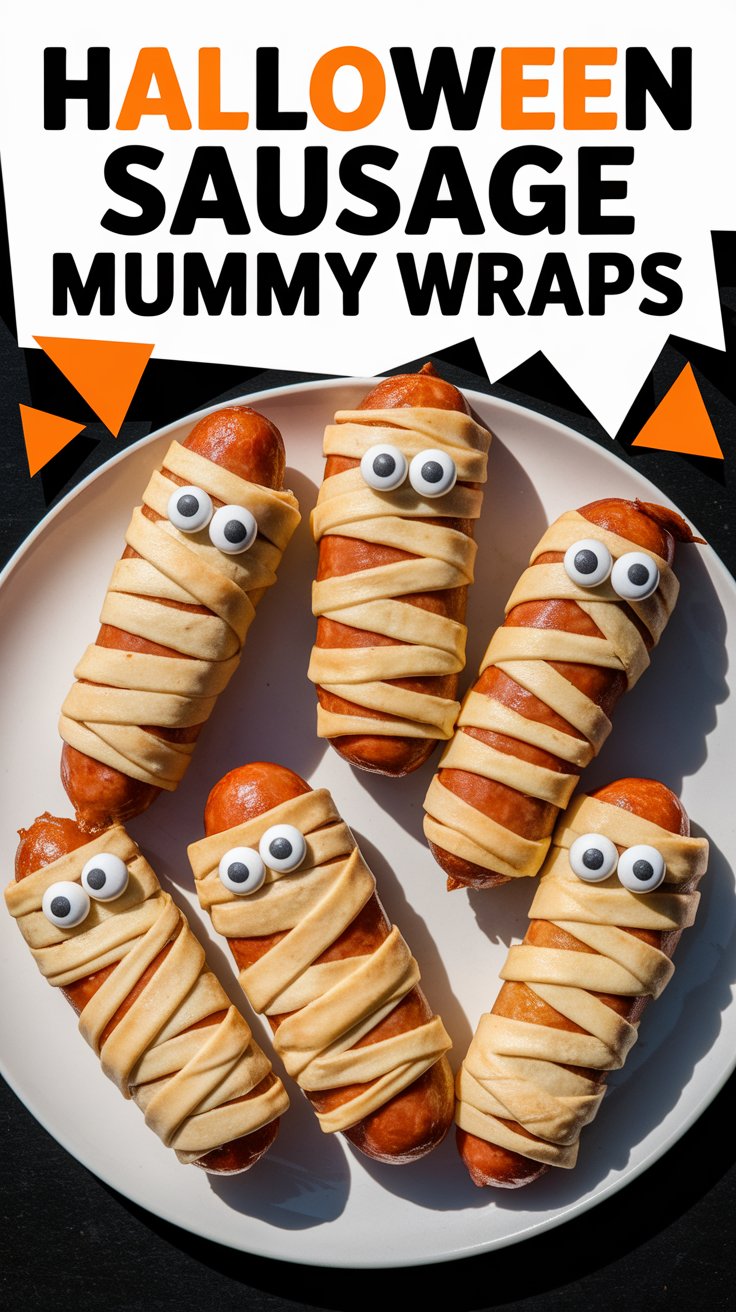
They’re not just delicious — they’re adorably creepy, incredibly simple to make, and an absolute hit with both kids and adults. Picture golden, flaky pastry wrapped around juicy sausages, with playful eyes peeking through — that’s a mummy snack you’ll never forget!
This guide takes you through everything — from ingredients and preparation to tips, variations, serving ideas, and make-ahead storage. Whether you’re hosting a party, a classroom gathering, or just a cozy Halloween night at home, these mummy wraps are sure to steal the spotlight.
🕸️ Why You’ll Love Halloween Sausage Mummy Wraps
There are hundreds of Halloween recipes out there, but few are as cute, quick, and crowd-pleasing as these mummy wraps. Here’s why they deserve a permanent place in your Halloween playbook:
- Effortless to Make – Ready in about 30 minutes, making them ideal for busy parents or last-minute party prep.
- Kid-Friendly Fun – Kids love helping wrap the mummies — it’s like crafting and cooking combined!
- Customizable – Choose between regular sausages, veggie links, or even cheesy fillings.
- Perfect for Parties – They’re handheld, tidy, and irresistibly festive — great as appetizers or snacks.
- Make-Ahead Friendly – Prepare them in advance, refrigerate, and bake fresh when needed.
Whether you’re serving them as an after-school snack or the highlight of your spooky buffet, they’ll vanish faster than you can say “Boo!”
🧂 Ingredients for Halloween Sausage Mummy Wraps
Before you start crafting these spooky bites, make sure you have everything ready. The list is short, simple, and easy to find in any grocery store:
- 1 package of crescent roll dough – This will form the “bandages” of your mummies.
- 1 package of cocktail sausages (about 24 small pieces) – You can also use hot dogs cut into halves.
- 2 tablespoons mustard or ketchup – For the mummy eyes.
- Optional:
- Mini cheese slices (for cheesy mummies 🧀)
- Dried herbs (like oregano or garlic powder) for extra flavor
- Melted butter (for brushing the dough before baking)
💡 Pro Tip: Keep the dough cold before using — it’s easier to slice and wrap neatly.
🔪 How to Make Halloween Sausage Mummy Wraps
Now that your ingredients are ready, let’s bring these spooky mummies to life. Follow these simple, step-by-step instructions for perfect results every time.
🥐 Step 1: Preheat the Oven
Set your oven to 375°F (190°C) or according to your crescent dough’s package instructions. Preheating ensures that your dough bakes evenly and turns golden.
🔪 Step 2: Prepare the Crescent Dough
Unroll the crescent dough onto a clean surface. Using a pizza cutter or sharp knife, slice it into thin strips (about ½ inch wide). These strips will become the mummy’s “bandages.”
No need for perfection — the more irregular, the spookier your mummies will look!
🌭 Step 3: Wrap the Sausages
Take each cocktail sausage and start wrapping it with one or two dough strips, leaving a small space for the “face.” Overlap the strips slightly to give a fun, wrapped look.
If you’re adding cheese, tuck a tiny piece under the dough before wrapping.
🧺 Step 4: Arrange on Baking Sheet
Line your baking tray with parchment paper (for easy cleanup). Arrange the wrapped sausages, leaving at least 1 inch of space between each mummy to allow the dough to puff up.
🔥 Step 5: Bake to Golden Perfection
Bake the mummies for 12–15 minutes, or until the dough turns golden brown and the sausages are heated through.
The smell of buttery pastry filling your kitchen? That’s your Halloween spirit awakening. 🎃
👀 Step 6: Add the Eyes
Once slightly cooled, use a toothpick to dot two small eyes on each mummy using mustard or ketchup. You can also use tiny olive slices, sesame seeds, or even candy eyes for extra flair.
🧠 Tips for Success
To make your mummy wraps picture-perfect and party-ready, keep these expert tips in mind:
- Work with chilled dough for easier wrapping.
- Don’t overwrap — leave some sausage showing for a realistic mummy effect.
- Add eyes after cooling to prevent condiments from melting.
- Brush with butter before baking for extra shine and flavor.
- Serve warm for the best texture and taste.
🧑🍳 Equipment You’ll Need
You don’t need a fancy setup — just a few basic tools will do:
- Baking sheet
- Parchment paper or foil
- Pizza cutter or sharp knife
- Pastry brush (optional)
- Toothpick for detailing
Simple tools, big results!
🌶️ Variations of Halloween Sausage Mummy Wraps
One of the best parts of this recipe is how adaptable it is. You can twist it in so many ways to fit your preferences or party theme.
🥕 Vegetarian Mummies
Use plant-based sausages or veggie links for a meat-free version that’s equally delicious.
🌶️ Spicy Mummies
Add jalapeño slices inside or use spicy sausage links for those who like a little heat.
🧀 Cheesy Mummies
Insert a small cube of cheddar or mozzarella inside before wrapping — gooey perfection!
🌿 Herbed Mummies
Sprinkle the dough with dried oregano, thyme, or garlic powder before baking for a savory upgrade.
🧒 Mini Mummies
Use mini sausages or cut hot dogs into smaller pieces for bite-sized treats perfect for kids’ parties.
🍽️ Serving Suggestions
These mummy wraps are incredibly versatile — serve them as a snack, appetizer, or even a playful dinner side. Here are some creative ways to present them:
- Halloween Party Platter: Arrange your mummies in a spiral shape on a black or orange platter.
- Serve with Dips: Offer ketchup, mustard, ranch, or barbecue sauce for variety.
- Add a Spooky Touch: Garnish your tray with plastic spiders or fake cobwebs.
- Pair with Drinks: Apple cider, orange punch, or a spooky purple mocktail go perfectly.
- Create a Snack Bar: Let guests “build their own mummies” with toppings and sauces.
🧊 How to Store and Reheat
🕒 Storing Leftovers
If you have leftovers (rare, but possible!), store them in an airtight container in the refrigerator for up to 3 days.
🔁 Reheating
- Oven: 5–7 minutes at 350°F until warm and crisp.
- Air Fryer: 3–4 minutes at 350°F for best texture.
- Microwave: 30 seconds — but note, the dough may soften.
❄️ Can You Freeze Halloween Mummy Wraps?
Absolutely! These wraps freeze beautifully.
To freeze (uncooked):
- Assemble the mummies, place them on a baking sheet, and freeze until solid.
- Transfer to a freezer bag.
- Bake directly from frozen, adding 3–4 extra minutes.
To freeze (cooked):
- Cool completely before freezing.
- Reheat in oven or air fryer until hot.
💬 FAQs About Halloween Sausage Mummy Wraps
Q1: Can I make these mummy wraps ahead of time?
Yes! Wrap the sausages and refrigerate up to a day in advance. Bake right before serving for the best texture.
Q2: What can I use instead of crescent dough?
Puff pastry or biscuit dough both work well. Puff pastry gives a flakier, more buttery texture.
Q3: How do I make gluten-free mummy wraps?
Use gluten-free puff pastry or dough. Most major brands now carry a GF option that works beautifully.
Q4: Can I serve them cold?
You can, but they taste best warm. If serving at a party, keep them on a warming tray.
Q5: What’s the best dip for these wraps?
Classic mustard and ketchup are always winners, but try chipotle mayo, garlic aioli, or spicy BBQ sauce for a fun twist!
🍁 Halloween Party Pairing Ideas
If you’re hosting a full Halloween spread, pair your mummy wraps with these festive companions:
- 🧀 Cheeseburger Skull Sliders – Juicy mini burgers shaped like skulls.
- 🕷️ Spider Cookies – Sweet treats that perfectly balance the savory wraps.
- 🎃 Pumpkin Deviled Eggs – A healthy and thematic side dish.
- 🧡 Orange Mac & Cheese Jack-o’-Lantern Bowls – Creamy comfort food in spooky form.
Together, they make a stunning Halloween menu that’s equal parts spooky and scrumptious!
🧤 Safety & Cooking Tips
Even though these mummy wraps are simple, here are a few reminders to keep things safe and stress-free:
- Always wash hands before handling dough and sausages.
- Don’t overcrowd the baking tray — it prevents proper puffing.
- If cooking with kids, handle knives and ovens for them.
- Use oven mitts — crescent dough can brown fast near the end.
- Always let them cool slightly before serving to kids.
🎨 Presentation & Decoration Ideas
Your Halloween table deserves just as much flair as your costumes!
- Place the mummy wraps on a dark slate tray for contrast.
- Add fake spider webs around the platter.
- Stick tiny flags with names into each mummy for a personalized touch.
- Arrange them in a spiral “graveyard” style with dipping sauces in cauldrons.
Remember — food presentation is half the fun at a Halloween party!
🌟 Nutritional Information (Per Serving)
Approximate values for 1 mummy wrap:
- Calories: 150 kcal
- Fat: 10 g
- Saturated Fat: 3 g
- Carbs: 10 g
- Sugar: 1 g
- Protein: 5 g
- Sodium: 300 mg
(Values may vary depending on the type of sausage and dough used.)
💡 Expert Pro Tips
- Use mini mozzarella pearls for edible eyes — they look realistic and taste great.
- Add smoked paprika to the dough for a subtle smoky flavor.
- Serve with a “bloody” ketchup drizzle for extra Halloween effect.
- Prepare a DIY mummy station for kids to make their own — it’s a hit at parties!
🧡 The Story Behind the Recipe
Every family has a Halloween tradition — carving pumpkins, telling ghost stories, or baking themed goodies. For many, these Sausage Mummy Wraps have become that tradition.
They bring people together — little hands wrapping dough, laughter echoing through the kitchen, and the joy of seeing each mummy take shape. It’s about more than food; it’s about creating memories that last long after Halloween night fades.
So, next time you’re planning your spooky spread, remember — it’s not just about how they taste, but how they make everyone feel.
🕯️ Conclusion: Wrap Up the Fun!
Halloween is the one time of year when food can be both spooky and adorable, and these Halloween Sausage Mummy Wraps perfectly capture that spirit.
They’re quick, festive, and guaranteed to make every guest smile. Whether you’re crafting them for a kids’ party, a potluck, or a fun family night, these little mummies will turn your Halloween into an unforgettable feast.