
If you’ve ever watched Gordon Ramsay in the kitchen—whether on MasterChef, Hell’s Kitchen, or one of his restaurant specials—you know he treats scallops like edible gold. When they hit the pan, you can almost hear his voice: “Don’t move them! Let them sear!”
This isn’t just a fancy chef’s trick. Ramsay’s approach to pan-seared scallops is all about precision, restraint, and respecting the natural sweetness of the seafood. The result? Scallops that are crispy and caramelized on the outside, buttery and tender on the inside—the kind of dish that makes you feel like you’re dining in a Michelin-starred restaurant without leaving home.
In this guide, you’ll learn not just how to cook scallops like Gordon Ramsay, but also the why behind each step. From selecting the best scallops to mastering the sear, we’ll cover every detail so your scallops turn out perfect every single time.
Why This Gordon Ramsay Scallop Recipe is a Game-Changer
The beauty of this dish lies in its simplicity. You don’t need exotic spices, complex marinades, or expensive equipment. You need:
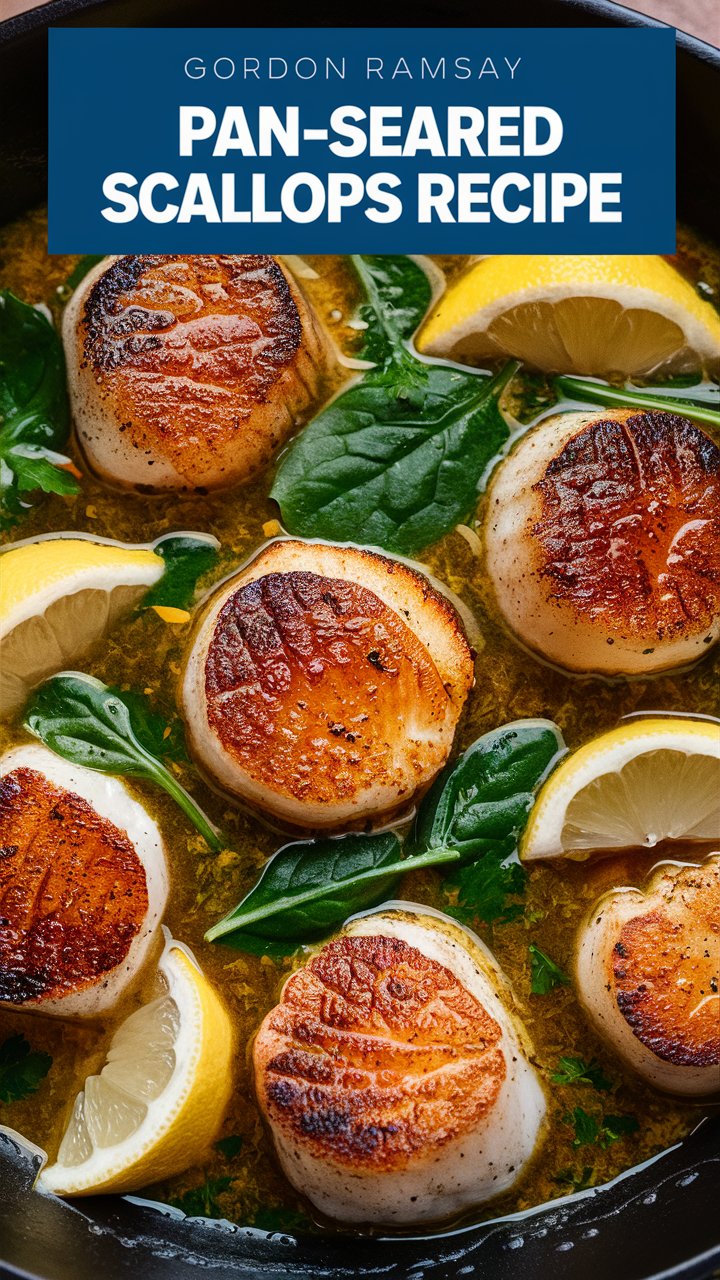
- High-quality scallops
- A pan that gets screaming hot
- Oil and butter for searing and flavor
- The confidence to leave them alone in the pan until that golden crust forms
This minimalistic method lets the scallops shine without distractions. Ramsay’s philosophy here is simple: when your ingredient is perfect, your job is to highlight it—not hide it.
Here’s what makes this recipe stand out from other pan-seared scallop guides:
- The dry scallop rule – Ramsay always insists on dry-packed scallops because moisture is the enemy of a good sear.
- Controlled heat – Start hot, finish gently.
- Butter basting – That final minute of cooking is when magic happens: nutty butter, fresh herbs, and garlic infuse into the scallops without overpowering them.
Ingredients You’ll Need (and Why They Matter)
For the Scallops:
- 8 large sea scallops (dry-packed preferred) – Dry-packed scallops are free from additives, allowing them to caramelize instead of steaming.
- Salt and pepper, to taste – Enhances natural sweetness without masking it.
- 1 tablespoon olive oil – A neutral oil with a high smoke point keeps the scallops from burning.
- 1–2 tablespoons unsalted butter – For richness and that signature Ramsay finish.
- 1 clove garlic, crushed – Infuses subtle aroma without becoming bitter.
- 1 sprig fresh thyme or rosemary (optional) – Herbs add elegance and depth.
- Lemon wedges, for serving – Brightens and balances the richness.
Optional Sides or Garnishes:
- Pea or cauliflower purée – Smooth, colorful, and complements scallops’ sweetness.
- Microgreens or arugula – Fresh, peppery contrast.
- Crusty bread or creamy mashed potatoes – Comfort food pairings for a complete meal.
Pro Tip: If buying frozen scallops, thaw them overnight in the fridge and pat them completely dry before cooking.
Essential Tools for Perfect Pan-Seared Scallops
The tools you use are almost as important as the technique.
- Cast iron skillet or stainless steel pan – Holds heat evenly, essential for developing that golden crust.
- Tongs or fish spatula – Helps you flip scallops gently without tearing the crust.
- Paper towels – Removes surface moisture before cooking.
- Small spoon – Perfect for butter basting in the final minute.
Avoid nonstick pans—they don’t hold enough heat for proper caramelization.
Step-by-Step Instructions (Chef-Level Precision)
Step 1: Prep the Scallops
- Remove the small side muscle (a chewy bit on the edge of each scallop).
- Pat scallops dry with paper towels—do this twice if needed.
- Season both sides lightly with salt and pepper.
Step 2: Heat the Pan
- Place your skillet over high heat until it’s almost smoking.
- Add olive oil and swirl to coat the surface.
Step 3: Sear Without Touching
- Place scallops flat-side down, leaving space between each one.
- Let them cook undisturbed for 1½–2 minutes.
- Resist the urge to peek—this is how the crust forms.
Step 4: Flip and Butter-Baste
- Turn each scallop carefully.
- Add butter, garlic, and herbs to the pan.
- Tilt the pan slightly and spoon melted butter over scallops for 1 minute.
Step 5: Serve Immediately
- Transfer to a warm plate.
- Garnish with lemon wedges and your chosen sides.
Chef’s Pro Tips for Flawless Scallops
- Temperature control is key – Start with high heat for the sear, then lower slightly after flipping to prevent overcooking.
- Pat dry again if needed – Even a few drops of water can ruin the crust.
- Don’t overcrowd the pan – Too many scallops will steam instead of sear.
- Butter at the end – Adding butter too early can cause it to burn.
Common Mistakes and How to Avoid Them
- Mistake: Scallops are pale and soft.
Fix: Pan wasn’t hot enough or scallops were wet. - Mistake: Scallops are rubbery.
Fix: Cooked too long—remove from heat as soon as they’re opaque in the center. - Mistake: Butter burned before basting.
Fix: Use oil first, add butter later.
Delicious Serving Ideas
- Classic fine dining: Scallops over pea purée with microgreens.
- Comfort twist: Serve with creamy garlic mashed potatoes.
- Light and fresh: Pair with citrus salad and avocado slices.
- Elegant starter: Three scallops with a drizzle of white wine sauce.
Health & Nutrition Benefits
Scallops are a nutrient powerhouse:
- Low in fat and calories – About 100 calories per 3-ounce serving.
- High in protein – Great for muscle health and satiety.
- Rich in minerals – Potassium, magnesium, and vitamin B12 support heart and brain function.
- Omega-3 fatty acids – Promote cardiovascular health.
Make-Ahead and Storage Tips
- Prep ahead: Clean, dry, and season scallops a few hours in advance; store in the fridge on paper towels.
- Cook fresh: Best texture and flavor come from scallops made right before serving.
- Leftovers: If needed, store in an airtight container in the fridge for 1 day—avoid reheating in a pan; use gently warmed sauces instead.
Variations on the Classic
- Garlic Butter Scallops – Double the garlic for a more intense flavor.
- Lemon Caper Scallops – Add capers with the butter for a tangy punch.
- Asian Soy-Ginger Scallops – Swap butter for sesame oil, finish with soy sauce and grated ginger.
- Cajun Scallops – Rub with Cajun seasoning before searing for a spicy kick.
Pairing Scallops with Wine & Drinks
- Best wine matches: Sauvignon Blanc, Pinot Grigio, or Champagne.
- Beer lovers: Try a crisp pilsner.
- Non-alcoholic: Sparkling water with lemon or cucumber slices.
Troubleshooting FAQs
Q: What’s the difference between dry and wet scallops?
A: Dry scallops have no chemical additives and sear beautifully; wet scallops are treated with phosphates, which retain water and prevent browning.
Q: Why won’t my scallops brown?
A: They’re either too wet or your pan isn’t hot enough.
Q: Can I use frozen scallops?
A: Yes—thaw overnight in the fridge, then pat dry thoroughly.
Q: How many scallops per person?
A: Starter: 3 scallops; Main: 5–6 scallops.
Q: Best oil for searing?
A: Olive oil, grapeseed, or avocado oil—anything with a high smoke point.
Final Thoughts
Cooking scallops like Gordon Ramsay isn’t about memorizing a recipe—it’s about mastering the technique. With dry scallops, high heat, patience, and that final butter baste, you’ll have a dish that’s as impressive as it is simple.
So next time you want to wow dinner guests—or just treat yourself—remember: hot pan, dry scallops, and hands off until it’s time to flip.
Meta Description:
Master the art of Gordon Ramsay pan-seared scallops with this chef-level guide. Learn how to get a perfect golden crust, buttery center, and restaurant-quality flavor in your own kitchen.