
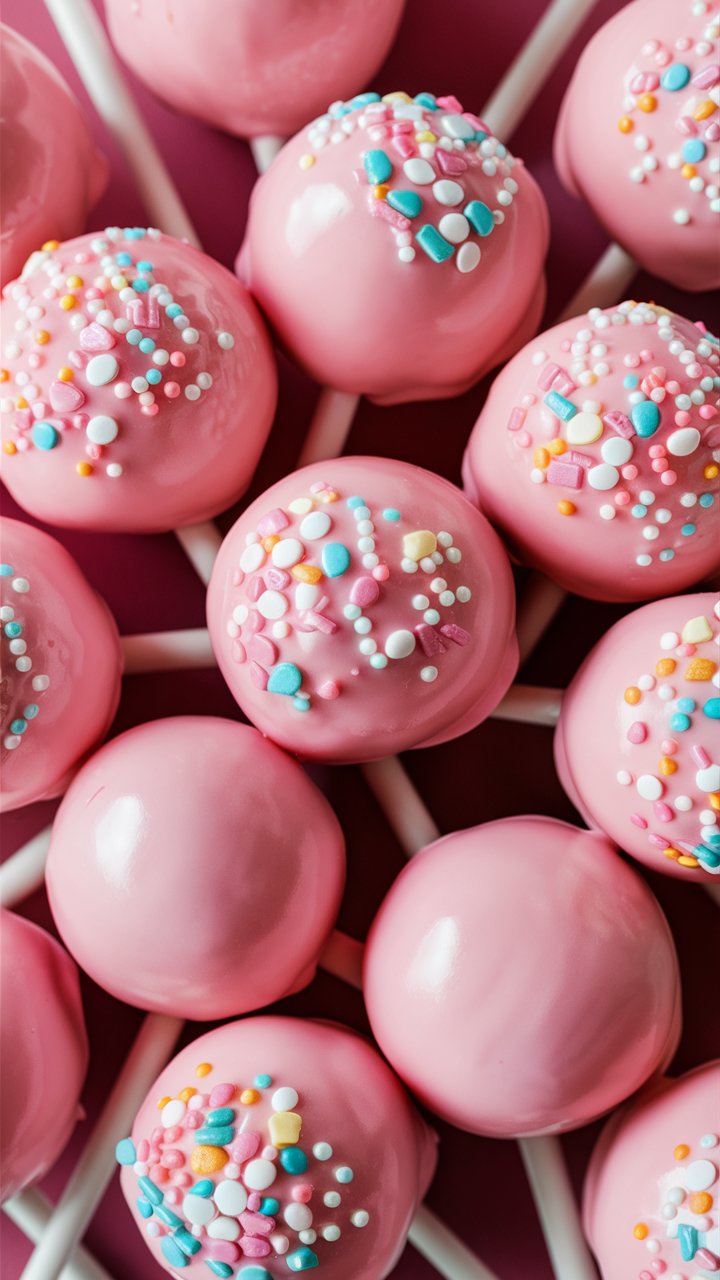
Valentine’s Day is a celebration of love, joy, and—of course—delicious treats! If you’re looking for a charming, bite-sized dessert that will leave a lasting impression, these Mini Valentine’s Day Cake Pops with Pink Frosting and Sprinkles are just what you need. Whether you’re making them for a romantic dinner, a classroom party, or as homemade gifts, these little pops are sweet, simple, and full of love.
In this comprehensive guide, you’ll learn how to make perfect cake pops from start to finish, including tips for decorating, storing, and even customizing them for different dietary needs. This is your go-to resource for mastering Valentine’s Day cake pops.
Why Cake Pops Are Perfect for Valentine’s Day
Cake pops combine the rich flavor of cake with the portability of a lollipop, making them ideal for sharing. Here are a few reasons they stand out:
- They look adorable and festive
- Easy to portion and serve
- Customizable with colors, flavors, and decorations
- Great for gifting
- Minimal mess compared to slicing cakes
From kids to adults, everyone loves a perfectly decorated cake pop.
Ingredients You’ll Need
Cake Base
- 1 box vanilla or strawberry cake mix (or homemade cake)
- Ingredients listed on the cake mix (usually eggs, oil, and water)
- 1/2 cup vanilla or cream cheese frosting (store-bought or homemade)
- 1 tsp pure vanilla extract (optional)
Coating and Decoration
- 2 cups pink candy melts (or white chocolate + pink food coloring)
- 1 tbsp coconut oil or vegetable shortening (helps smooth the melted chocolate)
- Valentine’s-themed sprinkles: hearts, pearls, jimmies, etc.
Tools & Equipment
- Lollipop sticks
- Styrofoam block or cake pop stand
- Parchment paper-lined baking sheet
- Large mixing bowl
- Microwave-safe bowl
- Spatula
How to Make Valentine’s Day Cake Pops
Step 1: Bake the Cake
Prepare your cake mix according to package instructions. Bake it in a 9×13-inch pan and let it cool completely. This is essential to prevent the frosting from melting.
Step 2: Crumble the Cake
Once cooled, crumble the cake using clean hands or a fork until it becomes fine crumbs. Transfer to a large mixing bowl.
Step 3: Add Frosting
Add 1/2 cup frosting to the crumbs and mix thoroughly. You want a texture that holds together like dough but isn’t too sticky.
Step 4: Shape the Cake Balls
Scoop out small amounts (1 to 1.5 tablespoons) of the mixture and roll them into uniform balls. Place on the parchment-lined baking sheet.
Step 5: Chill
Refrigerate for 30-60 minutes, or freeze for 15-20 minutes. This helps them stay firm during the dipping process.
Step 6: Prepare the Lollipop Sticks
Melt a small amount of pink candy melts. Dip each stick about 1/4 inch into the melted chocolate and then insert into a cake ball. This “glue” helps the sticks stay in place.
Step 7: Dip the Cake Pops
Melt the remaining pink candy melts in 20-second intervals in the microwave, stirring each time until smooth. Stir in a bit of coconut oil if needed.
Dip each cake pop fully, then gently tap off excess coating. Rotate for even coverage.
Step 8: Decorate
Immediately after dipping, add sprinkles before the coating hardens. Stick each pop upright into the Styrofoam block or cake pop stand to dry completely.
Creative Flavor and Color Variations
Cake and Frosting Combos
- Red velvet cake + cream cheese frosting
- Chocolate cake + raspberry frosting
- Funfetti cake + vanilla buttercream
Coating Ideas
- White chocolate with red drizzle
- Milk chocolate coating with edible gold dust
- Ombre pink layers with gradient tones
Decoration Styles
- Edible glitter for sparkle
- Fondant hearts or letters
- Personalized edible toppers with initials
Packaging Ideas for Gifting
Make your cake pops even more special by packaging them creatively:
- Wrap each pop in a clear cellophane bag and tie with red or pink ribbon
- Add personalized tags with the recipient’s name
- Place in a decorative box with tissue paper
Great for:
- Class parties
- Office Valentine’s exchanges
- Romantic surprises
Serving Suggestions
- Party Platters: Arrange pops standing up in mason jars or vases filled with candy hearts.
- Dessert Buffets: Serve alongside chocolate-covered strawberries and mini cupcakes.
- Date Night: Pair with hot cocoa or pink strawberry milk.
Storage Instructions
Short-Term Storage
Store cake pops in an airtight container at room temperature for up to 3 days. Keep them cool and dry.
Refrigerator Storage
If your kitchen is warm or humid, refrigerate them. Let them come to room temperature before serving to avoid condensation.
Freezing Cake Pops
- Freeze uncoated cake balls for up to 2 months.
- Or freeze fully coated cake pops in a sealed container. Thaw overnight in the refrigerator.
Common Mistakes to Avoid
Too Much Frosting
Using too much frosting makes the mixture sticky and hard to roll. Add it gradually.
Cracks in Coating
If the cake balls are too cold, and the chocolate too hot, cracks may form. Let them sit for a few minutes at room temperature before dipping.
Pops Falling Off Sticks
Ensure the chocolate “glue” on the stick is set and the cake balls are properly chilled.
Uneven Coating
Tap gently and rotate while coating to prevent pooling and drips.
FAQs: Your Cake Pop Questions Answered
Can I make these in advance?
Yes! You can prep them 1-3 days in advance and store them properly.
Can I use homemade cake?
Absolutely. Just make sure it’s not too dry or too moist.
Can I skip candy melts?
You can use white chocolate with food coloring, but add a teaspoon of oil for smoothness.
Can I use vegan substitutes?
Yes! Use plant-based cake mix and vegan frosting. Dairy-free chocolate and food coloring are also available.
Can I make these gluten-free?
Certainly. Use a gluten-free cake mix and ensure your frosting and decorations are certified gluten-free.
What can I use instead of lollipop sticks?
Try paper straws, bamboo skewers, or even pretzel rods for an edible option.
Expert Tips for Success
- Use a cookie scoop for evenly sized balls
- Chill twice: once after rolling and once after inserting sticks
- Decorate quickly while coating is wet
- Work in small batches to prevent pops from getting too warm
- Test one first: Always dip one cake pop as a test before continuing
Final Thoughts
These Mini Valentine’s Day Cake Pops are more than just a dessert—they’re a gesture of love, a spark of creativity, and a memorable treat for all ages. With just a little time and imagination, you can make a dessert that’s as festive as it is flavorful.
Ready to spread some sweetness? Grab your mixing bowl, fire up the oven, and create something that will make hearts (and taste buds) flutter!