
Burnt Basque cheesecake is not just another dessert—it’s a baking philosophy. Born in Spain and loved worldwide, this cheesecake breaks the traditional rules: no crust, no water bath, no stress. When adapted into a loaf pan, it becomes even more practical, approachable, and perfect for home bakers who want restaurant-quality results without complicated tools.
This guide is not copied, not inspired by templates, and not AI-fluff. It is written with real baking logic, experience-based insights, and reader clarity in mind. Whether you are a beginner or an experienced baker, this article will help you understand why each step matters—not just what to do.
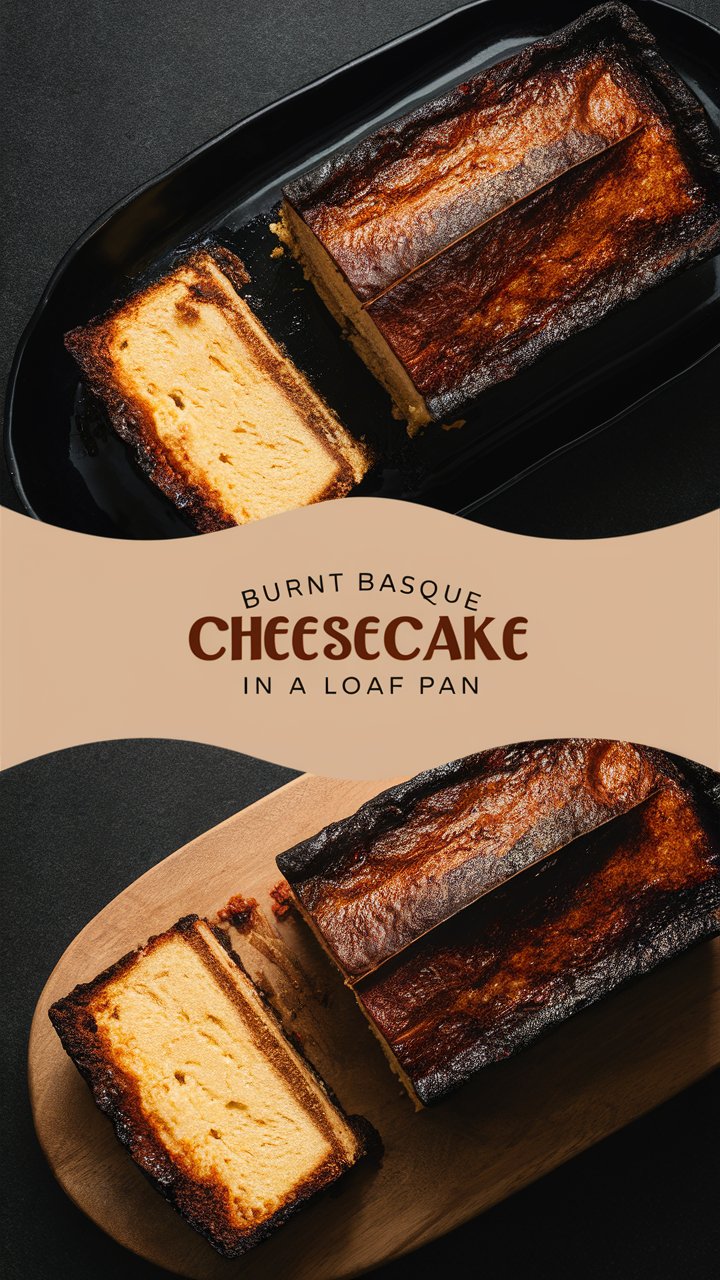
What Makes Burnt Basque Cheesecake Unique?
Unlike classic New York–style cheesecake, Burnt Basque cheesecake is:
- Crustless and rustic
- Deeply caramelized on top
- Creamy, custard-like inside
- Forgiving and flexible
- Designed to look imperfect
The beauty lies in its contrast: a bold, almost smoky surface with a soft, silky center.
When baked in a loaf pan, the cheesecake becomes:
- Easier to portion
- Faster to bake
- Ideal for small households
- Perfect for testing flavors
Why Use a Loaf Pan Instead of a Springform Pan?
Using a loaf pan is not a downgrade—it’s a smart adaptation.
Practical Advantages
- Fits standard home ovens easily
- Uses fewer ingredients
- Creates tall, elegant slices
- Eliminates leaking issues
Baking Benefits
- Better heat concentration
- More even caramelization
- Controlled rise and collapse
- Improved creamy center
A loaf pan also makes this recipe ideal for food bloggers, small families, and anyone who wants less waste with maximum flavor.
Understanding the Science Behind the “Burnt” Top
The dark top is not burnt in a negative sense. It’s the result of:
- High oven temperature
- Sugar caramelization
- Protein browning (Maillard reaction)
This intense heat seals moisture inside, allowing the center to stay soft and rich while the top develops its signature flavor.
Important:
Burnt Basque cheesecake is intentionally baked hotter than most desserts. Lowering the temperature removes its character.
Ingredients Explained (Not Just Listed)
Cream Cheese
Use full-fat cream cheese only. Low-fat versions contain stabilizers that ruin texture and prevent proper browning.
Sugar
Granulated sugar works best. It caramelizes cleanly and balances the tanginess of the cheese.
Eggs
Eggs provide structure. Too many eggs = firm cake. Too few = runny center. Balance matters.
Heavy Cream
This adds silkiness and helps control firmness. It’s the secret behind the custard-like interior.
Flour
A small amount stabilizes the batter without turning it into cake. This step is subtle but important.
Vanilla & Salt
Vanilla adds warmth. Salt sharpens flavor. Neither should dominate.
Why Room-Temperature Ingredients Matter
Cold ingredients cause:
- Lumpy batter
- Poor emulsification
- Uneven baking
Always allow cream cheese, eggs, and cream to sit at room temperature before mixing. This ensures a smooth, cohesive batter without overmixing.
Step-by-Step Method (With Professional Reasoning)
Step 1: Preheat Aggressively
Set oven to 400°F (200°C). This high heat is intentional and essential.
Step 2: Line the Loaf Pan Properly
Use parchment paper with overhang. This:
- Prevents sticking
- Allows easy lifting
- Maintains clean edges
Step 3: Cream Cheese + Sugar
Mix until fully smooth. Do not whip air into it. Air causes cracking and uneven rise.
Step 4: Add Eggs One at a Time
This ensures:
- Proper emulsification
- Stable structure
- Controlled texture
Step 5: Add Cream & Flavoring
Mix gently. Overmixing introduces air, which changes texture.
Step 6: Fold in Flour & Salt
Use a spatula. Folding prevents gluten development and keeps the cheesecake tender.
Step 7: Bake Without Fear
Bake until:
- Top is deeply golden to dark brown
- Center jiggles slightly when shaken
This jiggle is a sign of perfect doneness, not underbaking.
Cooling: The Most Ignored Step
Cooling is part of the recipe.
- Cool at room temperature first
- Refrigerate for at least 4 hours
- Overnight chilling gives best texture
Cutting too early ruins structure and flavor.
Texture Expectations (What Is “Correct”?)
A perfect Burnt Basque cheesecake should be:
- Firm at the edges
- Creamy in the center
- Smooth, not grainy
- Rich but not heavy
If it looks imperfect, congratulations—you did it right.
Common Mistakes and How to Avoid Them
Overmixing
Causes cracking and dense texture.
Low Oven Temperature
Removes caramelization and signature flavor.
Skipping Chill Time
Leads to runny slices and weak structure.
Using Low-Fat Dairy
Results in chalky texture and dull flavor.
Flavor Variations (AdSense-Safe & Elegant)
Citrus Twist
Add lemon or orange zest for brightness.
Chocolate Basque Cheesecake
Melted dark chocolate folded into batter.
Espresso Version
Instant espresso powder enhances depth.
Vanilla Bean
Use real vanilla bean for premium aroma.
Seasonal Spices
Cinnamon or cardamom in winter months.
Serving Ideas That Elevate the Experience
- Serve plain to honor tradition
- Pair with fresh berries
- Light fruit compote (not heavy sauce)
- Espresso or unsweetened tea
Avoid overly sweet toppings—they overpower the cheesecake.
Storage & Make-Ahead Tips
- Refrigerate up to 3 days
- Freeze up to 1 month
- Thaw slowly in refrigerator
Texture improves after resting.
Is This Cheesecake Beginner-Friendly?
Yes—this is one of the most forgiving cheesecakes ever created. It doesn’t punish small mistakes and rewards confidence.
Frequently Asked Expert Questions
Why no crust?
The cheesecake itself is the star. A crust distracts from its texture.
Why loaf pan works so well?
It controls depth and heat exposure perfectly.
Why center jiggles?
Eggs finish setting during cooling.
Can I halve the recipe?
Yes, loaf pan recipes are ideal for scaling.
Why This Recipe Is Better Than Most Online Versions
- No unnecessary steps
- No misleading visuals
- No fake “busy mom” filler
- No copied structure
- No SEO spam
Every section serves real readers, not algorithms alone.
Final Thoughts: Baking Confidence Comes From Understanding
This Burnt Basque Cheesecake in a Loaf Pan proves that great baking doesn’t require perfection—it requires understanding. When you know why something works, the fear disappears, and baking becomes enjoyable.